3 GIMP Tutorials
Nov. 2nd, 2006 01:13 pmI don't know how well these translate to other programs, these are made specifically for GIMP.
Also, I'm using caps from the recent episode of Torchwood. No spoilers really.
Pretty picture heavy.
Tutorial #1
Using only color layers
 to
to 
Tutorial #2
Using color layers and GIMP curves
 to
to 
Tutorial #3
Difficult on this is probably medium as I use curves, color layers and the Filter Pack.
 to
to 
If any of this makes no sense, please let me know! Have fun with these and remember to not follow these exactly. Thank you.
Results are snaggable.
Also, I'm using caps from the recent episode of Torchwood. No spoilers really.
Pretty picture heavy.
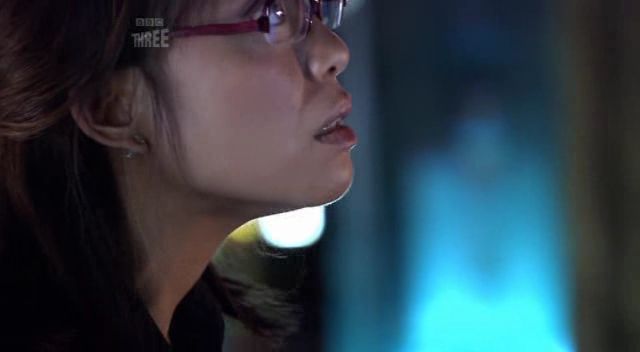
Tutorial #1
Using only color layers
to Step 1: Open your image and crop to your liking.
Step 2: Scale image (100x100) and shapen to liking (Filters>Enhance>Sharpen). I did 35.
Step 3: Duplicate the base 3 times.
Step 4: Set the first layer to Dodge at 50.0 opacity.

Step 5: Set the other two layers to Screen, 100.0

Step 6: Create a new layer and fill with FBE7C1 (peach) and set to Multiply, 100.0

Step 7: New layer, fill with C1EFFB (blue) and set to Burn, 100.0

Step 8: New layer, fill with FFF7E3 and set to Burn, 50.0

Step 9: New layer, fill with a light gray (E7E7E7) and set to Overlay, 60.0

Step 10: New layer, fill with same light gray color, E7E7E7 and set to Grain Extract, 15.0

Flatten and after using the Blur tool on her neck:
Play around with the colors as they won't work with every image.
Step 2: Scale image (100x100) and shapen to liking (Filters>Enhance>Sharpen). I did 35.
Step 3: Duplicate the base 3 times.
Step 4: Set the first layer to Dodge at 50.0 opacity.
Step 5: Set the other two layers to Screen, 100.0
Step 6: Create a new layer and fill with FBE7C1 (peach) and set to Multiply, 100.0
Step 7: New layer, fill with C1EFFB (blue) and set to Burn, 100.0
Step 8: New layer, fill with FFF7E3 and set to Burn, 50.0
Step 9: New layer, fill with a light gray (E7E7E7) and set to Overlay, 60.0
Step 10: New layer, fill with same light gray color, E7E7E7 and set to Grain Extract, 15.0
Flatten and after using the Blur tool on her neck:
Play around with the colors as they won't work with every image.
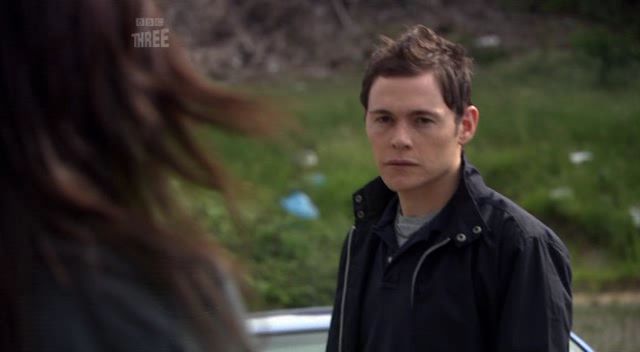
Tutorial #2
Using color layers and GIMP curves
to Step 1: Open image and crop.
Step 2: Scale image and sharpen.
Step 3: Duplicate the base 4 times.
1st layer - Screen 25.0
2nd layer - Screen 100.0
3rd layer - Screen 40.0
4th layer - Overlay 40.0
While still on the 4th layer, go to Layer>Colors>Curves
Value: 79/176
Red: 69/186
Green: 157/94
Blue:75/175

Step 4: New layer, fill with a pale green, C4FFB0 and set to Burn, 75.0

Step 5: New layer, fill with a peach, F4E1CE and set to Burn, 75.0

Step 6: New layer, fill with C4FFB0 again and set to Soft Light (or Overlay), 40.0

Step 7: New layer, fill with F4E1CE again and set to Multiply, 20.0
And flatten. Please remember to play with settings as they won't work with every image. Have fun!
Step 2: Scale image and sharpen.
Step 3: Duplicate the base 4 times.
1st layer - Screen 25.0
2nd layer - Screen 100.0
3rd layer - Screen 40.0
4th layer - Overlay 40.0
While still on the 4th layer, go to Layer>Colors>Curves
Value: 79/176
Red: 69/186
Green: 157/94
Blue:75/175
Step 4: New layer, fill with a pale green, C4FFB0 and set to Burn, 75.0
Step 5: New layer, fill with a peach, F4E1CE and set to Burn, 75.0
Step 6: New layer, fill with C4FFB0 again and set to Soft Light (or Overlay), 40.0
Step 7: New layer, fill with F4E1CE again and set to Multiply, 20.0
And flatten. Please remember to play with settings as they won't work with every image. Have fun!
Tutorial #3
Difficult on this is probably medium as I use curves, color layers and the Filter Pack.
to Alright, this is a long one and it may actually have steps that aren't needed, but this is helpful, I believe, to help get a understanding of how to work GIMP. If not, let me know, thank you.
Step 1: Open image and crop.
Step 2: Scale image and sharpen to liking (again, go to Filters>Enhance>Sharpen)
Step 3: Duplicate the base 3 times.
Step 4: Set the first layer to Hard Light, 100.0 opacity

Step 5: Set the 2nd layer to Screen, 25.0
Step 6: Set the 3rd layer to Screen, 100.0

Step 7: Still on this 3rd layer, go to Layers>Colors>Curves
Value: 216/255
Red: 125/193
Green: 128/190
Blue: 130/187

Step 8: New layer, fill with FFEBC4 and set to Multiply, 100.0

Step 9: New layer, fill with EAFFE3 and set to Burn, 50.0
Step 10: New layer, fill with EAFFE3 and set to Overlay, 10.0

Step 11: New layer, fill with E3EBFF and set to Burn, 100.0
Step 12: New layer, fill with E3EBFF and set to Overlay, 10.0

Step 13: Flatten Image
Step 14: Go to Tools>Color Picker
Click on the lightest spot on her cheek. I ended up with FFE6BA as my color.
Step 15: New layer, fill with this color, and set to Grain Extract 30.0

Step 16: New layer, fill with white and set to Overlay, 25.0

Step 17: Flatten Image
Step 18: This is purely experimental. This will NOT work with each cap, so play with settings. Duplicate your base. Go to Filters>Colors>Filter Pack
First, under Affected Range, click Shadows and then under Windows, click on Hue
Click Yellow, than Blue, then Cyan. Close this window only
Second, under Affected Range, now click Highlights, and go back to Hue under Windows
Click Yellow, Magenta and then Cyan. Close this window only
Third, click Midtones under Affected Range and go to Value under Windows
Click Darker. Close this window and clikc OK.
Set this filter layer to 50.0-100.0 (any that you like) and flatten image.
Step 1: Open image and crop.
Step 2: Scale image and sharpen to liking (again, go to Filters>Enhance>Sharpen)
Step 3: Duplicate the base 3 times.
Step 4: Set the first layer to Hard Light, 100.0 opacity
Step 5: Set the 2nd layer to Screen, 25.0
Step 6: Set the 3rd layer to Screen, 100.0
Step 7: Still on this 3rd layer, go to Layers>Colors>Curves
Value: 216/255
Red: 125/193
Green: 128/190
Blue: 130/187
Step 8: New layer, fill with FFEBC4 and set to Multiply, 100.0
Step 9: New layer, fill with EAFFE3 and set to Burn, 50.0
Step 10: New layer, fill with EAFFE3 and set to Overlay, 10.0
Step 11: New layer, fill with E3EBFF and set to Burn, 100.0
Step 12: New layer, fill with E3EBFF and set to Overlay, 10.0
Step 13: Flatten Image
Step 14: Go to Tools>Color Picker
Click on the lightest spot on her cheek. I ended up with FFE6BA as my color.
Step 15: New layer, fill with this color, and set to Grain Extract 30.0
Step 16: New layer, fill with white and set to Overlay, 25.0
Step 17: Flatten Image
Step 18: This is purely experimental. This will NOT work with each cap, so play with settings. Duplicate your base. Go to Filters>Colors>Filter Pack
First, under Affected Range, click Shadows and then under Windows, click on Hue
Click Yellow, than Blue, then Cyan. Close this window only
Second, under Affected Range, now click Highlights, and go back to Hue under Windows
Click Yellow, Magenta and then Cyan. Close this window only
Third, click Midtones under Affected Range and go to Value under Windows
Click Darker. Close this window and clikc OK.
Set this filter layer to 50.0-100.0 (any that you like) and flatten image.
If any of this makes no sense, please let me know! Have fun with these and remember to not follow these exactly. Thank you.
Results are snaggable.
no subject
Date: 2006-11-02 06:47 pm (UTC)no subject
Date: 2006-11-02 07:19 pm (UTC)no subject
Date: 2006-11-02 08:55 pm (UTC)Really awesome tuts, +mems. Thank you!
no subject
Date: 2006-11-02 09:00 pm (UTC)no subject
Date: 2006-11-03 01:21 am (UTC)no subject
Date: 2006-11-03 03:38 am (UTC)no subject
Date: 2006-11-03 01:44 am (UTC)no subject
Date: 2006-11-03 03:39 am (UTC)no subject
Date: 2006-11-03 04:18 pm (UTC)no subject
Date: 2006-11-03 04:21 pm (UTC)no subject
Date: 2006-11-04 01:00 am (UTC)no subject
Date: 2006-11-04 03:05 am (UTC)no subject
Date: 2006-11-08 04:43 pm (UTC)